Import 3D and Mouse Navigation
Import a 3D model and learn how to use the mouse.
Suggested Product: Publisher3D
Alternatively, this tutorial can be completed using Pages3D Professional after completion of the “Pages3D Primer” tutorial.
This part of the course is relevant for both Publisher3D and Pages3D users. The 3D tools in Publisher3D and Pages3D are similar and the concepts learned here in Publisher3D are also directly relevant to Pages3D use.
Publisher3D Workflow Overview
You create content using Publisher3D and the following basic workflow:
- Import the 3D Model
- Create a series of illustrations
- Use the Storyboard to order illustrations
- Publish a Storyboard of Illustrations to your desired format
Each new illustration you create will capture the view’s parameters, such as: viewpoint, visible objects, selected objects, render style, parts list, sectioning, and the current exploded view step.
Often, you will need to create exploded views, customize parts lists or modify materials assigned to the 3D model. Additionally, configurations may be used to organize the model into subsets of parts for easier navigation and parts list creation. These changes do not affect the original CAD file.
As you become more proficient with the software, you can automate aspects of the content creation by: mastering Smart Template Technology™, updating content when 3D CAD files are modified, and leveraging batch modifications of storyboard illustrations.
This training will begin with the basic workflow indicated above and build on that foundation over the rest of the course.
Import a 3D Model
The first step of any Publisher3D project is to import a 3D CAD model. QuadriSpace products support numerous 3D CAD file formats such as SolidWorks, Inventor, Creo Design, Pro/ENGINEER, Solid Edge, SketchUp, Rhino as well as standard interchange formats like DWF, STEP, IGES and ACIS.

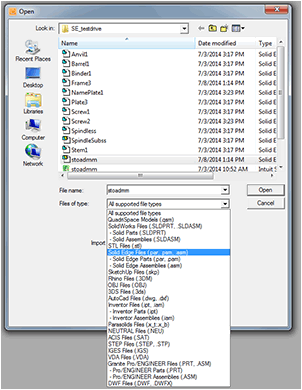
Open 3D Dialog
Import 3D Model
- From the startup screen, Click on Import Model…. If you do not see a startup screen, you can alternatively use Application Menu > Open…
- Browse and find the Solid Edge file “stoadmm.asm”.
- Alternatively, if you do not have Solid Edge installed, open the file “stoadmm.qsm” instead.
- Click OK.
The Application Menu is found in the top-left portion of the user interface. This menu provides access to common commands such as save, open, export, print and the software options.

Application Menu
Alternatively, you can export your model as a QuadriSpace Model, QSM File, when a QuadriSpace Exporter is available for the 3D CAD tool.
About Exporter Add-ins
Exporters are currently available for SolidWorks, Inventor, Solid Edge and Rhino. Generally exporters include additional information that may not be available when the file is directly imported. Gaining access to metadata, some materials and in some cases exploded views created in the 3D CAD tool may only be available from the relevant exporter.
Navigate with the Mouse
The Viewpoint ribbon group is available on most ribbons.

Viewpoint Ribbon Group
This group provides a set of tools that allows you to set the behavior of the mouse or select standard viewpoints. This allows you to manipulate the 3D view and set up the viewpoint before saving a new illustration.
Rotate, Pan and Zoom
- From the Viewpoint group, click on Rotate
- Move the mouse over the 3D view and observe the mouse cursor indicating the current mouse mode, it should indicate rotation.
- Click the left mouse button and hold it down.
- Now move the mouse to rotate the 3D view. When the button is pressed and held down, notice that the mouse cursor disappears. The left mouse button will execute the command that is chosen in the Viewpoint group.
- When you are done rotating, release the mouse. The cursor will reappear.
- Now, try this with the Pan mouse mode. Click on Pan in the Viewpoint group, click and hold the mouse over the 3D view and then move the mouse to pan the 3D scene.
- Try the Zoom mouse mode.
The “Zoom to Area” mouse mode lets you box in an area of the 3D view that you would like to zoom into. Let’s try it.
Zoom to Area
- From the Viewpoint group, click on the pulldown next to the Zoom button. Then select Zoom to Area
- Move the mouse over the 3D view. Notice the mouse cursor is a magnifying glass with a box.
- Now, drag out a box over the area that you would like to zoom into. That is, left click on the top-left, hold down the mouse button, drag the mouse, and then release on the bottom-right corner.
- Observe that the view zooms into the boxed in area.
- Now, click on Home to set the view back to its original isometric viewpoint. The Home button can be very useful if you accidentally lose track of your 3D model.
Extended Mouse Modes
The middle and right mouse button can be used to reduce the need to switch between mouse modes. The middle mouse button will pan the 3D view and the right mouse button will zoom in and out of the 3D view. Generally, setting your mouse mode to rotate and then using all three mouse buttons allows you to navigate the 3D view without switching between modes.
Updated less than a minute ago
